


Introduction
If you’re familiar to JavaScript or React, you probably have heard of Redux which is a popular state management library. Many businesses, including those working with an offshore development company, choose Redux for its simplicity and efficiency in managing state across complex applications, ensuring seamless collaboration across different time zones. Redux for Beginners is an essential topic when diving into JavaScript or React development. As your app grows, managing state is crucial in any application and handling state efficiently becomes increasingly challenging. This is where we need Redux.
The blog is a beginner’s guide where we’ll break down the basics of Redux by explaining its core principles and guide through setting up Redux in a simple React application. With Redux, even a dedicated team of developers can streamline state management, making it easier to collaborate on large-scale applications with consistent and predictable outcomes.
Redux vs. Context API
When deciding between Redux vs. Context API, it’s important to consider that Redux provides a more robust solution for large-scale applications with complex state logic, while Context API is often favored for simpler state management needs due to its minimal setup and direct integration with React.
What is Redux and how to use it?
Redux is a JavaScript library for predictable and maintainable global state management that helps developers manage application state consistently and efficiently. It is an open-source tool which ensures that state changes are predictable, making the code easier to debug, maintain, and scale, particularly in complex applications with multiple components sharing data. So in Redux introduction, we can say Redux is a predictable state container for JavaScript apps. Understanding Redux middleware for beginners can enhance state management by allowing for asynchronous operations, logging, and more, making it easier for new developers to manage complex side effects and streamline application logic.
How to Use Redux:
- Create a Store
- Define Actions
- Write Reducers
- Dispatch Actions
Is Redux easy to learn?
Redux can be easy to learn, but it does come with a learning process, especially if you’re new to state management or JavaScript frameworks like React. The core concepts of Redux state management are simple, but their implementation can sometimes feel a bit complex for beginners. As our blog title suggests, the Redux for Beginners guide will help learners understand state management with Redux.
React + Redux
In React applications where you have a considerable number of components which share some common state then state management could become troublesome. This is where Redux will be helpful for the state management. With Redux, your state is contained outside your component.
Why use Redux?
Predictable State: Redux centralizes state, ensuring consistent behavior across environments and simplifying testing by providing clear, predictable state management logic.
Debuggable: Redux allow to track state changes and logging, enabling detailed error reporting and easier debugging.
Maintainable: With a clear structured and separation of concerns, your code becomes more maintainable.
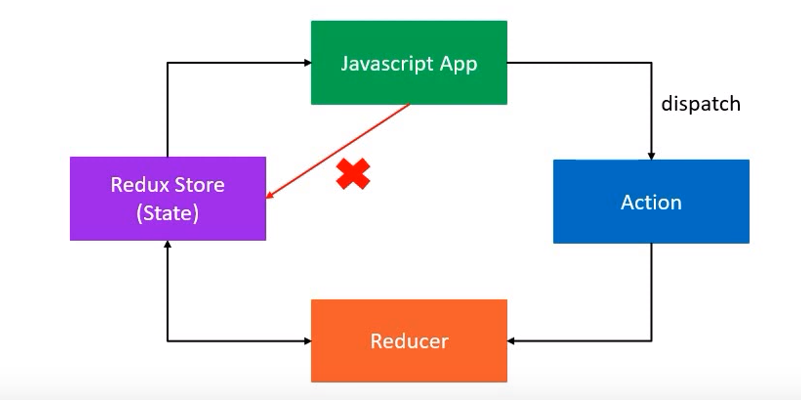
How Redux works?
The redux works using three core concepts:
- A store that holds the state of your application.
- An action that describes the changes in the state of the application.
- A reducer which carries out the state transition depending on the action.
Understanding Redux Principles
Actions
Actions are plain JavaScript objects that have a type property. They describe what happened in your application.
const INCREMENT = ‘INCREMENT’
const DECREMENT = ‘DECREMENT’

function increment() { return { type: INCREMENT }
function decrement() { return { type: DECREMENT }
Reducers
Specify how the app’s state changes in response to actions sent to the store. Accepts two parameters: state and action.
const initialState = {
      count: 0
}
const reducer = (state=initialState, action) => {
      switch (action.type) {
      case 'INCREMENT':
       return { count: state.count + 1 };
      case 'DECREMENT':
            return { count: state.count - 1 };
      default:
            return state;
      }
};
Store
Redux store setup brings together the state, actions, and reducers. It holds the application state and allows access to it.
import {createStore} from “redux”
const store = createStore(reducer);
Setting up Redux in a React Application
Step 1: Install Redux and React-Redux
First, you need to install Redux and React-Redux:
npm install redux react-redux
Step 2: Create an Action
Next create a js file and add action
const BUY_CAKE = ‘BUY_CAKE’

function buyCake() {
   return {
      type: BUY_CAKE
   }
}
Step 3: Create Reducer
Add the following code just below the action
const initialState = {
   numOfCakes: 10
}
const reducer = (state=initialState, action) => {
   switch(action.type) {
      case BUY_CAKE: return {
           …state,
           numOfCakes: state.numOfCakes - 1
      }

      Default: return state
   }
}
Step 4: Create the Redux Store
The store is the central unit that holds the global state of your application. It stores all global state in one object.
import redux from “redux”
const createStore = redux.createStore
const initialState = {
   count: 10
}

// A simple reducer
const reducer = (state = initailState, action) => {
  switch (action.type) {
    case 'INCREMENT':
      return { count: state.count + 1 };
    case 'DECREMENT':
      return { count: state.count - 1 };
    default:
      return state;
  }
};

// Create the Redux store
const store = createStore(reducer);
Step 5: Provide the Store to Your React Application
The Provider component from react-redux wraps your app, giving all components access to the Redux store and actions.
import React from “react”;
import { Provider } from “react-redux”;
import ReactDOM from “react-dom”;

import App from “./App”;
import { store } from “./store”; // assuming your store is in store.js

ReactDOM.render(
  <Provider store={store}>
    <App />
  </Provider>,
  document.getElementById('root')
);
Connecting Redux to React Components
Step 6: Map State and Dispatch to Props
The connect function from react-redux links your React components to the Redux store, allowing them to access state and dispatch actions as props.
import React from “react”
import {connect} from “react-redux”

// A simple component
const Counter = ({ count, increment, decrement }) => (
  <div>
    <h1>{count}</h1>
    <button onClick={increment}>Increment</button>
    <button onClick={decrement}>Decrement</button>
  </div>
);

// Map state to props
const mapStateToProps = state => ({
  count: state.count
});

// Map dispatch to props
const mapDispatchToProps = dispatch => ({
  increment: () => dispatch({ type: 'INCREMENT' }),
  decrement: () => dispatch({ type: 'DECREMENT' })
});

export default connect(mapStateToProps, mapDispatchToProps)(Counter);
Conclusion
Redux for Beginners guide helps us to understand that the purpose of Redux is to simplify the state management in your applications. Best practices for Redux is that by following its core principles, developers can achieve a more organized and debuggable codebase. The above steps will be useful and easier for understanding the basics of how to set up and use Redux in your React applications to manage the state in our application. The benefits of using Redux include unified state management, improved debugging capabilities, and better predictability, making it a powerful tool for scaling applications while maintaining clean, manageable code. Additionally, the Redux Toolkit for beginners simplifies the process of setting up and managing state with built-in tools and best practices, making it the best starting point for developers who are new to Redux.

